Contenuto di questa lezione: patterns tratti dal libro FCP (Fundamental Chess Patterns), con molti diagrammi e partite di esempio.
30 Underpass & Overpasss
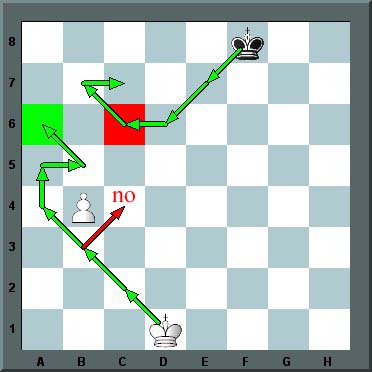
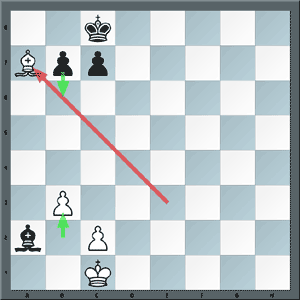
The critical squares for the b4-pawn are two ranks ahead, namely a6, b6 and c6.
In order to promote the pawn, White's objective is to seize control of one of the critical squares - any will do.
The outside critical square is a6, and it is the only critical square White is able to reach before Black,
as he will never be able to reach c6. It takes him 5 moves to reach c6 and only three moves to Black.
The path taken by White's King, crossing in front of his pawn to get to the critical square, is a maneuver known as "the Overpass", while the maneuver by which a King travels behind a passed pawn to reach the outside critical square is named "the Underpass".
The following underpass must be remembered: only critical square White can reach is a6 (not c6, that would be impossible):
1.  c2! e7
2. b3 d6
3. a4 c6
(if c4?, c6! and draws)
4. a5 b7
5. b5 c7
6. a6, done.
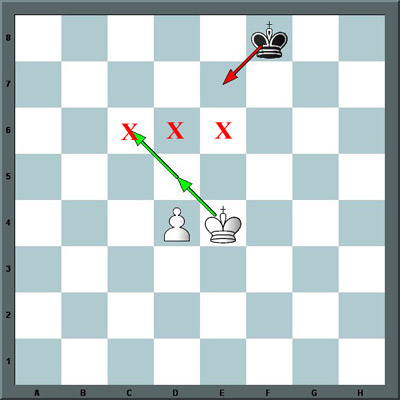
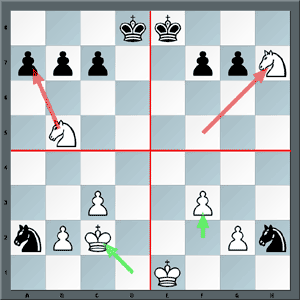
Here, the King with the pawn is not able to reach the nearest critical square e6, because the opposing King prevents him. In this example, it takes two moves for White to reach the nearest critical square, e6, but Black gets there with only one move: 1. e5?? e7.
However, within two moves White is also able to reach the external critical square c6, apparently farther (only apparently, as it takes just two moves as for the nearest critical square), which is effectively farther for Black, and White wins!
Note: The geometry of chess is different than the real world. In chess, the diagonal of a right-angled triangle is never longer than the larger of the two sides. (You won't find any 3-4-5 triangles here.) The external critical square is NOT farther, it's at the same distance, two squares!
1.d5! e7 2.c6! Overpass!
To draw, Black would have needed to be able to reach d7 in only one move, so as to prevent access to all three critical squares. This would have been possible if his King had been on c8, for example.
You can find other examples in any book on pawn endgames, but it is enough for your chess career to have a deep understanding of the above principle (and to know how to apply it correctly). Once you reach a critical square, go on applying opposition.
You can play through sample games and download the PGN here: Overpass (http://scacchi.vecchilibri.eu/partite/overpass.html)
a trivial, but recurrent pattern
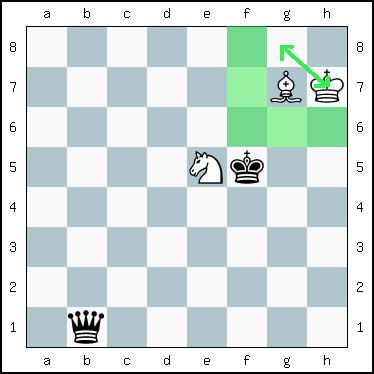
When chasing pawns, the attacker can get trapped by the advance of another pawn, so be careful when considering the capture of a Rook pawn by a Bishop (or a Knight, see next).
Intermediate and final positions.
You can play through sample games and download the PGN here: Trapping a piece (http://scacchi.vecchilibri.eu/partite/trapping_a_piece.html)
You probably think "This would never happen to me!" Well, in the very first game of the
1972 Spassky-Fischer tournament, an even game after 29. b5, Fischer played
29. ...  xh2 to the astonishment of the audience. A suicide.
Fritz's evaluation after this move is 2.21 for White: game over. See the following page, as shown from Black's point
of view.
xh2 to the astonishment of the audience. A suicide.
Fritz's evaluation after this move is 2.21 for White: game over. See the following page, as shown from Black's point
of view.

I could comment that Fischer would not have lost had he read this booklet beforehand. Actually, in Arrabal's opinion, it is difficult to believe that Fischer did not see that this move would lose a game that was certainly drawn. It is assumed that he intended to show his disdain for his opponent, giving away the game in this unexpected way, as he did later with the second game. He attended the third game while down 0-2, and again played Black. Not many would have been willing keep playing a world championship tournament this way.
For completeness, the game continued like this:
30. g3 h5 31. e2 h4 32. f3 e7 33. g2 hxg3 34. fxg3 xg3 35. xg3 d6 36. a4 d5 37. a3 e4 38. c5 a6 39. b6 f5 40. h4 f4 41. exf4 xf4 42. h5 f5 43. e3 e4 44. f2 f5 45. h4 e5 46. g5 e4 47. e3 f6 48. g4 e5 49. g5 d5 50. f5 a5 51. f2 g5 52. xg5 c4 53. f5 b4 54. xe4 xa4 55. d5 b5 56. d6 1-0
You can follow this game here: Fischer - Spassky (http://scacchi.vecchilibri.eu/partite/fischer.html)
A famous joke: Back in 1972, in a Russian gulag, the prisoners were listening to the world championship on the radio. When the wardens noticed this, the radio was seized, leaving them without news for weeks. A new Russian prisoner arrived, so everybody gathered around to see if he had news about the match. His answer was: I lost.
32 Trapping a Knight
Trapping a Knight, clockwise.
Another way to get trapped is to end up with a Bishop behind your own pawn chain. Normally this is only a temporary situation that will not last, but if this happens in an endgame with a fixed pawn chain, it is like playing a piece down.
You can play through sample games and download the PGN here: Trapping a Knight (http://scacchi.vecchilibri.eu/partite/trapping_a_knight.html)
33 Noah's ark
Then we have the Noah's Ark Trap, a classic, when the Queen is obliged to step back after an unwary attack, leaving the Bishop trapped.
The example follows a bad Sicilian opening, where the Bishop attacks the Knight recklessly,
b5, as if it were a Ruy Lopez, and following a6 steps back to a3 (see diagram).
Following b5, b3, c4 traps the Bishop.
The origin of the name is uncertain. According to Wikipedia, the shape of the black pawns on a6, b5, and c4 may resemble an ark, or the name may suggest that the trap is "as old as Noah's Ark".
A similar position is reached in a famous game, a Ruy Lopez, with the Modern Steinitz Defense (C71). You can see it here: Steiner - Capablanca 1929 (http://scacchi.vecchilibri.eu/partite/steiner.html).
Besides the above examples, use great care if you are Black and are considering the capture of the b2 pawn with the Queen. Frequently, a trap is lurking there.
You can play through sample games and download the PGN here: Noah's Ark (http://scacchi.vecchilibri.eu/partite/Noah's Ark.html)
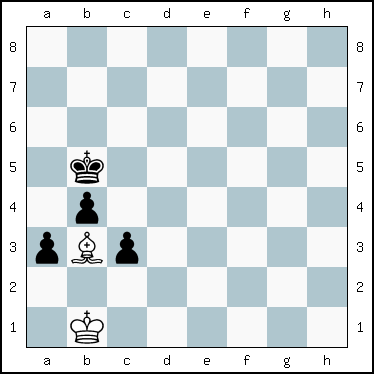
The fortress is a position where one side has a great material advantage, but the other side can hold on with waiting moves. It is the most natural defensive technique when the material disadvantage is great, and one is playing for a draw.
A normal feature of these positions is that Zugzwang cannot be forced, so waiting moves are available.
For 19 different examples of this technique, please see the book by De la Villa in the bibliography.
You can play through sample games and download the PGN here: Fortress (http://scacchi.vecchilibri.eu/partite/fortress.html)
The weaker player can draw by building a fortress and moving back and forth. This pattern is the better-known. White moves his Rook between f3 and h3, and moves out of check whenever necessary. Trying to be more active than this leads to disaster.
Another example, called the Karstedt position (1903), Bishop and Knight vs. Queen, White simply moves between h7 and g8.

Same motif, Bishop and Knight, always on a long diagonal, and the King close to the Bishop.
=/=
Another example, Black moves among g2, g3 and h2, preventing White's King from capturing the g5 pawn. Any attempt to capture it would lose the Knight or the h3 pawn, reaching a position with insufficient material to win.
1. ... g3 2. f1 h2 3. e2 g2 4. e3 g3
There is no way to enter this fortress: Black is going lose all his pawns if he tries.
lapaget vs. saintlucifer, gamegnot.com, 2015.08.2015
90... c5 91. c2 b5 92. b1 c5 93. c2 b5 94. b1 a5 95. c2 b5 96. b1
c5 97. c2 b5 98. b1 a2 99. xa2 c2 100. xc2 c4 101. b3 d3 102. e6 c2
103. b3 d2 104. e6 c2 105. b3 d2 106. e6 c2 107. b3 1/2-1/2
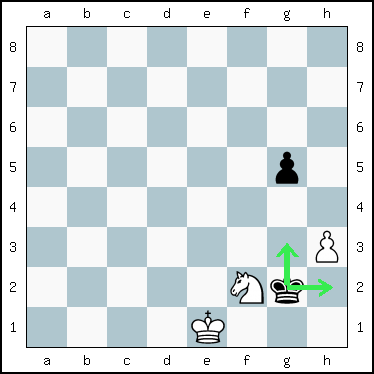
In a pawn endgame, when the opponent has a Knight, it is possible to be harassed by repeated checks and end up getting forked. It is therefore a good idea to maintain a safe distance, where the Knight has to make multiple moves before it can check your King again.
It is useful to remember that the Knight alternates colors on each move, so it needs an odd number of moves to threaten a square of the same color (1 or 3), and an even number of moves to threaten a square of a different color (2 or 4 or 6).
In the diagram above, with e8, White
gains only a single tempo - one free move where he will not be attacked.

In the diagram above, with d4,
a sort of diagonal opposition with one square between the Knight and
the King, White gains four tempi. It will take the Knight five moves to
check the King again.
Be aware of the difference between occupation and threat: in the second diagram the Knight cannot jump to the squares near the King or it would be captured.
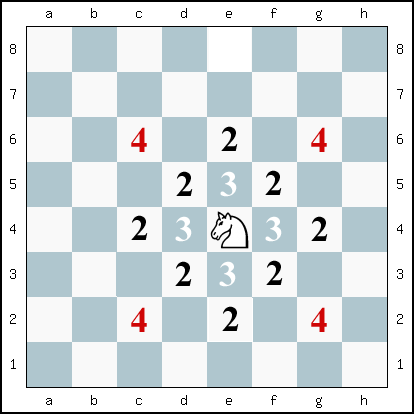
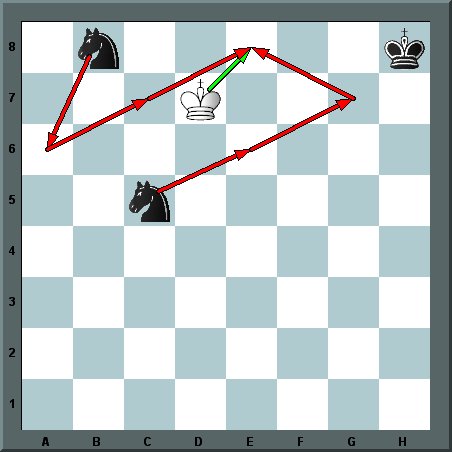
This diagram shows the moves needed to reach a nearby square from a central location (in contrast to the previous example, where the Knight was near the edge). As illustrated here, it will take three moves to check a King located on the square indicated with the digit "4". This knowledge is very useful in complicated endgames, where you don't want to spend all your precious time calculating knight forks.
Remember: a Knight on a central square attacks eight squares of the opposite color, and in just one move, it can jump to any one of these eight squares, and then attack eight squares of its original color. Even when you exclude the four squares in the diagonal opposition and the few squares that are too far away, a Knight can reach almost half the board in two moves. So, be careful when you move your King to a square of the same color as the Knight, because if you do not take the diagonal opposition, the Knight might be able to check your King immediately, and simultaneously fork one of your unprotected pieces.
You can play through sample games and download the PGN here: Knight diagonal opposition (http://scacchi.vecchilibri.eu/partite/knightdo.html)