+/-
Contenuto di questa lezione: patterns tratti dal libro FCP (Fundamental Chess Patterns), con molti diagrammi e partite di esempio.
25 Connected passed pawns
+/-
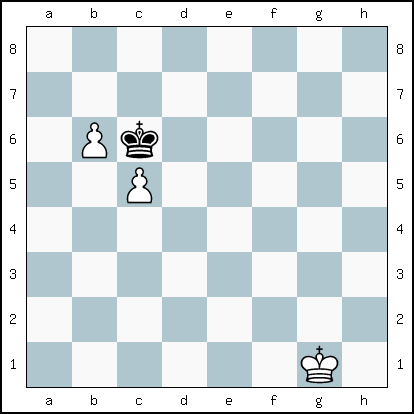
Two connected passed pawns: no doubts, nor uncertainty! This particular endgame pawn structure will occupy the attention of the defending King, which must stay near the most advanced pawn to prevent queening. If the King captures the rear pawn, the other will promote.
Meanwhile, the attacking King will capture all the remaining opponent's pawns, and then escort these pawns to the final rank.
1.  f2 b7
2. e3 c6
3. d4 b7
4. d5 a8
5. c6 b8
6. b7 a7
7. c7 a6
8. b8=
f2 b7
2. e3 c6
3. d4 b7
4. d5 a8
5. c6 b8
6. b7 a7
7. c7 a6
8. b8=
What's the use of this knowledge? When trading pieces and pawns in the transition from middle game to endgame, the winning side should try to reach a position like this if possible, transition to a won endgame, while the losing side should try to prevent it.
You can play through sample games and download the PGN here: Connected passed Pawns http://scacchi.vecchilibri.eu/partite/connectedpp.html
26 Two pawns one file apart
the way for White to win
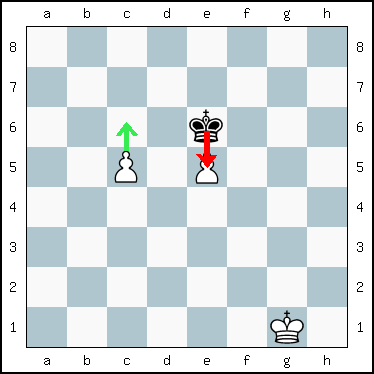
+/-
In this example, where White has the move, the unopposed pawn should advance. The defending King cannot capture the trailing pawn, since this would allow the leading pawn to promote.
With the pawns staggered, the defending King must step forward away from both pawns. As soon as the defending King does so, the trailing pawn can realign with the leading pawn. This pattern will repeat until one pawn promotes.
1. c6 e7
2. f2 e6
3. e3 e7
4. f4 d8
5. e6 e7
6. c7 xc6
7. c8=+
You can play through sample games and download the PGN here: Two pawns one file apart http://scacchi.vecchilibri.eu/partite/2p1fa.html
27 Trebuchet
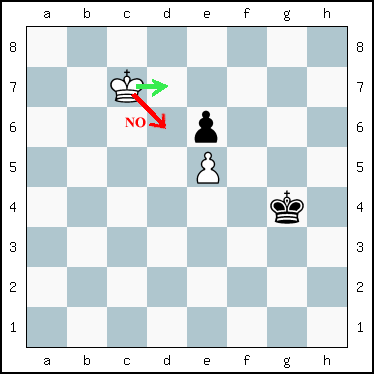
The Trebuchet is an extreme type of reciprocal zugzwang. It is also known as a full-point mutual zugzwang, because it will result in a total loss for the player that has the move (a full point for his opponent).
Corresponding squares are squares of mutual zugzwang. When there is only one pair of corresponding squares they are called "mined squares"". A player will fall into zugzwang if they move their King onto the mined square and their opponent is able to move onto the corresponding square. In the diagram above, the corresponding squares are d6 and f5.
If White attacks diagonally the pawn with d6,
Black replies with f5 putting White in zugzwang.
White is then forced to abandon his own pawn, allowing Black to capture it.
1. d6 f5
2. c5 xe5
3. c4 e4
... an easy win for Black
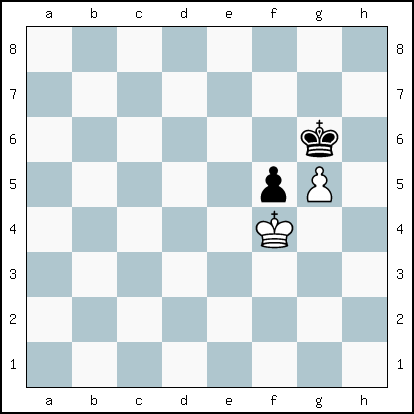
The winning move for White is to attack the pawn by moving horizontally,
d7.
To protect his pawn, Black must move f5 and White then moves d6.
Trebuchet.
Classical reference: Eugene Znosko-Borovsky - How to Play Chess Endings, page 13, diagram 6.
The difference being that in the previous diagram the King was in front of his pawn and in this case he is behind it. However, the essential point is the same in both cases, namely that the King has only one square available from which to defend his pawn.
Here White loses his pawn but draws:
1. f3 xg5
2. g3
... gaining the opposition, and securing a draw.
See also Marcel Duchamp's magisterial chess book titled: Opposition and Sister Squares are Reconciled, 1932
You can play through sample games and download the PGN here: Trebuchet (http://scacchi.vecchilibri.eu/partite/trebuchet.html)
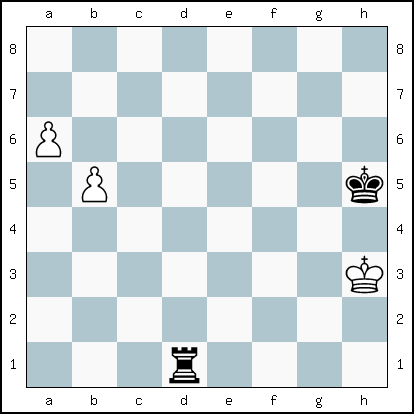
28 Two pawns on 6th rank vs. Rook
In a Rook vs. two pawns endgame, where the Kings play no part, the Rook usually captures both pawns, unless they are far advanced.
However, two connected passed pawns on the 6th rank will beat a Rook. Regardless of whose turn it is, one pawn will promote. The above diagram shows what happens when the Rook is only able to attack laterally:
1. ...  e6
e6
2. c7 (or b7) xp
3. the other pawn promotes
If the pawns are on the 5th rank instead, the Rook wins, except when the Rook is on the 6th rank, and the player with the pawns has the move.
But a famous guideline teaches that Rooks belong behind passed pawns. This is called "the Tarrasch rule", a general principle that applies in the majority of middlegames and endgames. Let's see what happens.
The player with the move wins.
The winning plan for Black is to move the Rook behind the more advanced pawn, attack the other pawn and capture both:
1. ... a1
2. g3 a5
3. f4 xb5
4. a7 a5 White resigns
The winning plan for White is to simply advance the rear pawn:
1. b6 b1
2. a7 and one pawn promotes.
Chess Trivia, quoting Aagard:
An old anecdote describes a game in a German club championship, the man playing White after some sweating plays Re1-a1. The crowd is at first stunned and silent, then one guy cannot contain his laughter.
The game is soon agreed a draw. The white player rushes out of the club, embarrassed and confused.
At home he writes a letter to Dr. Siegbert Tarrasch. He gives the position and asks if he had misunderstood something, or if the rook is not supposed to be placed behind the passed pawn.
Dr Tarrasch replies: "Dear Sir, Thank you for reading my column. Indeed you have understood my advice correctly and you shall do well to follow it in the future. However, in this very position, Re8 mate appears to be stronger than the move you played."
You can play through sample games and download the PGN here: Two pawns on 6th rank (http://scacchi.vecchilibri.eu/partite/cppawns.html)