Contenuto di questa lezione: patterns tratti dal libro FCP (Fundamental Chess Patterns), con molti diagrammi e partite di esempio.
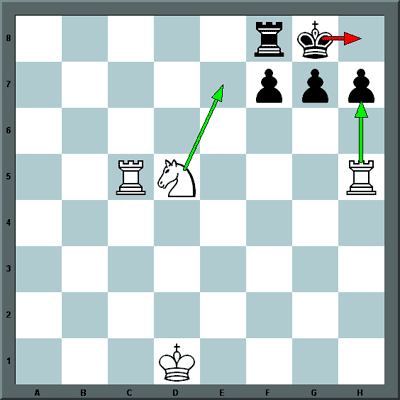
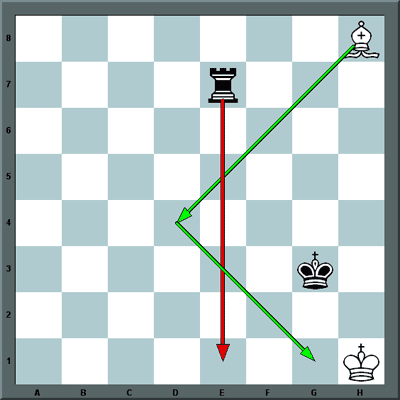
11 Matto d'Anastasia
Matto di Anastasia:
1.  e7+
e7+  h8 2.
h8 2.  xh7+ xh7
3. h5#
xh7+ xh7
3. h5#
Il nome deriva dalla novella tedesca: Anastasia und das Scachspiel by J. Heinse.
You can play through sample games and download the PGN here: Anastasia's Mate http://scacchi.vecchilibri.eu/partite/anastasia.html
Un esempio si può vedere qui: Anastasia's Mate http://scacchi.vecchilibri.eu/partite/anastasia.html
Fide Laws of Chess, Article 5: The completion of the game
5.2 a The game is drawn when the player to move has no legal move and his King is not in check.
The game is said to end in "stalemate". This immediately ends the game.
Stalemate is a resource that can enable the player with the inferior position to draw the game rather than lose.
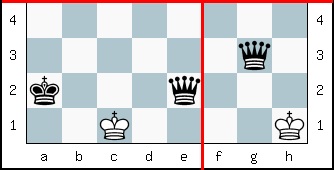
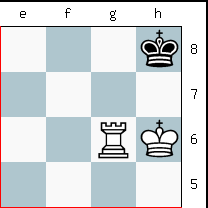
Right, a familiar Knight's jump position (the Queen and the King at a Knight's distance from each other). It is a draw (stalemate), because the King is not under check and has no square to go to.
If you only have a King left, do not resign; instead, try to reach this position. In particular, when your competitor is in time trouble, the game can easily result in a stalemate.
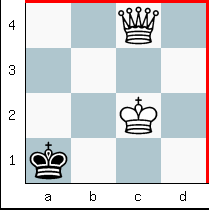
Left, a possible stalemate position, where the King is not in check, but it has no legal moves. This position can be reached by novice players, where the simple method of mating with the Queen and King is not well known, and/or the meaning of stalemate is not fully understood.
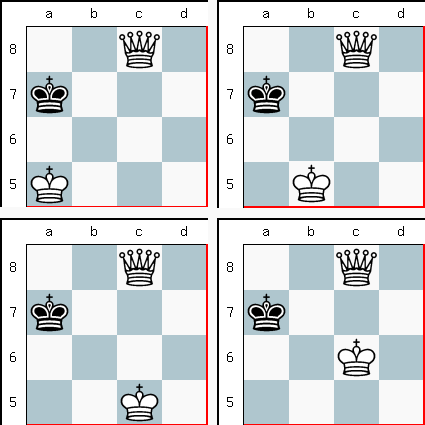
A series of 5 patterns that each look different, but in every case White's King controls b6 and Black's King has no legal moves. Any one of these stalemates can occur while moving the King or the Queen, so be careful!
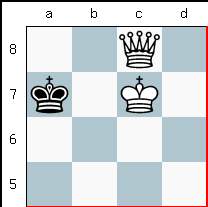
another difficult to see stalemate
A similar stalemate position occurred in the famous Saavedra position (http://scacchi.vecchilibri.eu/partite/saavedra.html) a composition by the chess columnist of the Glasgow Weekly Citizen, Barbier, inspired by a game Fenton - Potter, London 1875. A few days later, the Spanish priest Fernando Saavedra, showed the winning Rook promotion.

1. c7 d6+
2. b5 d5+
3. b4 d4+
4. b3 d3+
5. c2 d4!
6. c8= c4+
7. xc4 stalemate
c4+
7. xc4 stalemate
Additional stalemate patterns

The only ways to stalemate with a Rook
King and pawn vs. King
You can play through sample games and download the PGN here: Stalemate (http://scacchi.vecchilibri.eu/partite/stalemate.html)
An interesting collection of 49 games can be seen here: http://www.chessgames.com/perl/chesscollection?cid=1008242
19 Opposizione
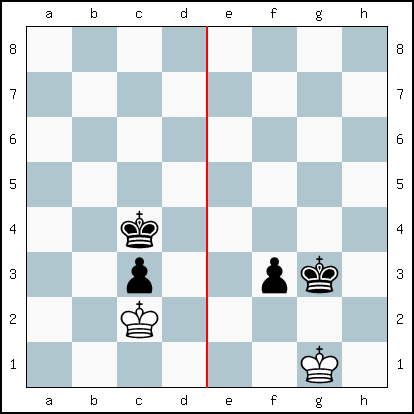
Il difensore deve stare sotto al pedone (a sinistra) o in opposizione al Re (a destra). L'attaccante deve riuscire a occupare le case critiche, una delle tre case davanti al pedone a due traverse di distanza (una traversa quando il pedone č sulla seta traversa come qui). Dopo avere occupato una casa critica scaccia il re e promuove il pedone. Ma in questo caso non c'è riuscito. Nel diagramma a sinistra č patta chiunque muova.
Quindi, se mossa al Nero, è patta in entrambi i casi:
1. ... d4 2. c1! d3
3. d1 c2 4. c1 c3 stallo
1. ... f4 2. f2! e si rientra nella posizione a sinistra.
Se la mossa è al Bianco:
a sinistra 1. c1 b3 2. b1
(in opposizione, l'unica), e se 2. ...c2 3. c1 patta
a destra, se 1. f1 viene buttato fuori con 1. ...f2 2. e2
Ma furbescamente, in Zeitnot del Nero, può sempre tentare rapidamente 1. h1
e se 1. ... f2?? è patta. Ma il Nero, va ad occupare la casa critica f2 con il Re, e vince.
Da non sottovalutare e da capire a fondo il concetto di opposizione, anche distante e anche diagonale. Molti 2N sono in
difficoltà in posizioni più complesse, ma con lo stesso principio.
Provate il seguente test: Re bianco in c1, Pedone Bianco in c2, Re nero in c8. Dovete riuscire a promuovere giocando col
Bianco, e a pattare giocando col Nero. Non devono esserci dubbi o esitazioni.
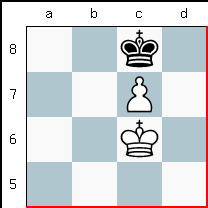
(Left diagram) Black to move:
1. ... d4
2. c1! d3
3. d1 c2
4. c1 c3 stalemate.
(Left diagram) White to move:
1. c1 b3
2. b1 (in opposition, the only move) and if 2. ... c2
3. c1 draws.
(Right diagram) White to move:
if 1. f1, 1. ... f2 forces the white King out.
(2. e2 g2 3. e3 f1=Q ).
But, this type of situation can be tricky.
For example, if Black is in time trouble, White can try
1. h1, and 1. ... f2?? draws,
as White is left with no legal move and he is not in check, stalemate.
But Black's King, if he is careful, will play 1. ... f2,
occupying a critical square, and win.
The concept of opposition (including distant or diagonal opposition) must be well understood and never underestimated. The opposition is gained by the King that does not need to move when the distance from the opponent's King is an even number of squares (or easier to remember, when the squares between them is an odd number).
In the right diagram above, White to move does not have the opposition, so he must give way.
Many intermediate players have problems in more complex situations of this kind, without realizing that the same fundamental principle applies.
Try the following test: White's King on c1, White's pawn on c2, and Black's King on c8. You must be able to promote the pawn when playing White, and try to make a draw when playing Black. There should be no doubts or hesitations. Learn and understand this theory, and test it out with a friend until you are sure of the solution, before trying it over the board.The above is fully explained in my book "The Most Important Chess Pattern",
You can play through sample games and download the PGN here: Opposition http://scacchi.vecchilibri.eu/partite/opposition19.html
You can train here: Opposition (http://www.chessvideos.tv/endgame-training/useful-maneuver-5.php)
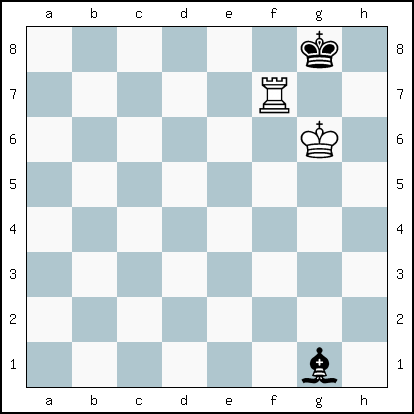
20 Torre contro Alfiere
come il Bianco puň pattare
=/+
Con Torre contro Alfiere è patta se il Re è nell'angolo di colore contrario al suo Alfiere: questo
può bloccare lo scacco in una casa adiacente al Re (guardare le frecce nel diagramma)..
Quindi, con mossa al Bianco: 1.  d4 e1+ 2. g1
White to move:
1. d4 e1+
2. g1. To avoid stalemate Black must move the Rook away from rank 1
or move the King away from g3 or h3. Any continuation draws.
You can play through sample games and download the PGN here: Rook vs. Bishop http://scacchi.vecchilibri.eu/partite/rvsb.html
+/-
What if the King is in the wrong corner? The plan is to make the Bishop move to a square where the color of the last rank square is opposite: so when attacked it cannot defend the mating square.
White to move:
1. f1 h2 2. h1 g3 3. h3 the Rook pushes the Bishop out of g and h-files d6
here the Bishop can protect the mating square when attacked
4. d3 c7 5. c3 attacks the bishop, unable now to protect the white mating square c8
d8 6. c8 f8 7. xd8+
Or: 1. f1 h2 2. h1 g3 3. h3 f4 a different approach, no use
4. a3 f8 forced move to avoid mate
5. f3 skewer e7
6. xf4
Nothing changes if it's Black to move, the sequence is just delayed:
1... h2 2. f1 g3
3. g1 h2
4. g2 d6
5. d2 c7
6. c2 d8
7. c8 f8
8. xd8+
21 Donna contro pedone

Mossa al Nero. La Donna non riesce a sloggiare il Re, a meno di un tragico errore del Bianco.
1 ... b6+ 2 a8 d8+ 3 b7 d7+ 4 b8 (se a8?? c8#) b5+ 5 a8 a6 6 b8 =
A queen versus pawn endgame arises most often from a race of pawns to promote. This endgame is usually an easy win for the side with the queen. However, if the pawn has advanced to its seventh rank it has possibilities of reaching a draw.
The strategy for the attacker are:
- getting the queen on a square in front of the pawn and then get the king over to help win the pawn
- or to check the defending king until it is forced in front of the pawn, and then using that tempo to bring the
king closer, until it can assist in winning the pawn.
The defender might have a chance at a draw when the pawn reached its seventh rank
and the king is nearby
and the pawns is a bishop pawn (c- or f-file) or a rook pawn (a- or h-file)
and the attacking King is far enough
and he knows how to defend.
Rook pawn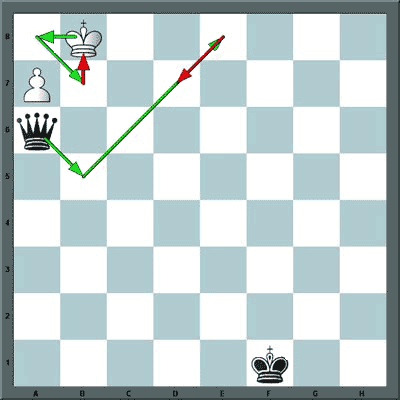
=/=
Black to move. The Queen is not able to drive away the King, unless White blunders.
1 ... b6+
2. a8 d8+
3. b7 d7+
4. b8! b5+
(if a8?? c8#)
5. a8 a6
6. b8 =
If White to move, not 1. Ka8?? Qc8# or 1. Kc7?? Qxa7, but simply 1. a8=Q
Bishop pawn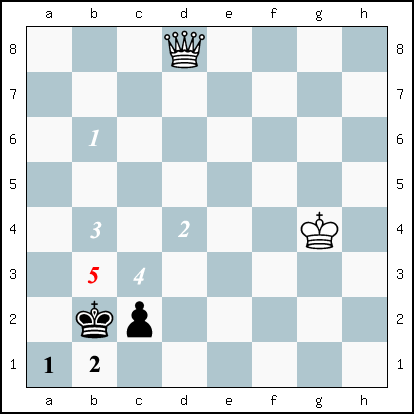
=/=
Stalemate defense. The strategy of the defender works if his King is on the side of the pawn near the corner. Then Black shifts between a1 and b1
1. b6+ a1!
2. d4+ b1
3. b4+ a1
4. c3+ b1
5. b3+ a1!
and White can not capture the pawn because stalemate would result (see pattern #16).
White wins only if his King is close enough to reach b3 or d2 in one move, because it can assist in checkmate.
You can play through sample games and download the PGN here: Queen vs. pawn (http://scacchi.vecchilibri.eu/partite/qvsp.html)
You can train here: Queen vs. Rook Pawn on Seventh Interactive Chess Endgame Practice (http://www.chessvideos.tv/endgame-training/custom-crafty-position.php?f=6Q1%2F8%2F8%2F8%2F8%2F3K4%2Fpk6%2F8&t=Winnable+Queen+vs.+Rook+Pawn+on+Seventh)