Contenuto di questa lezione: patterns tratti dal libro FCP (Fundamental Chess Patterns), con molti diagrammi e partite di esempio.
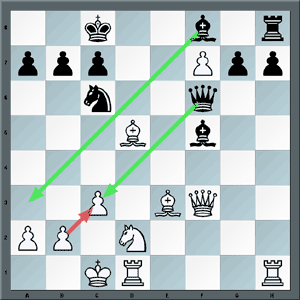
Matto di Boden, due Alfieri incrociati. Sembra molto confuso:  xc3, bxc3,
  a3#
a3#
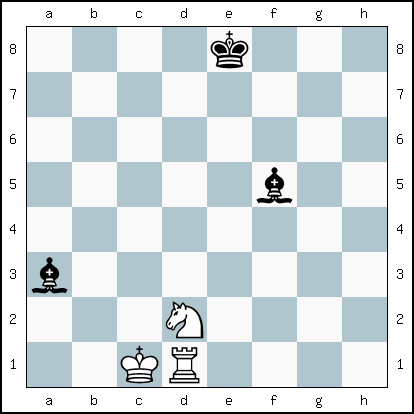
La posizione finale, evidente senza pezzi intorno.
Criss-cross diagonals mate to a King obstructed by friendly pieces.
Each Bishop controls diagonals and squares of different colors. They often control a box of four squares (here b1, b2, c1, c2),
where the King is mated if the escape squares (here d1, d2) are occupied by friendly pieces.
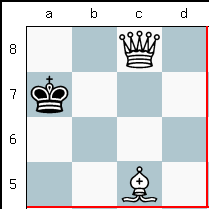
As it's often the case with Bishops, one can be replaced by the Queen.
As with other Mate Patterns, if you know well the desired position in its simpler form,
clearly pictured in your mind, you can imagine the final position, and find the moves to make it happen.
If you already control a diagonal near the King, you should look for a way to open the second diagonal and mate, as shown in the example above, with the Queen sacrifice.
L'originale č la corta partita R. Schulder vs Samuel Standidge Boden, London 1853, Philidor's Defence:
1.e4 e5 2.Nf3 d6 3.c3 f5 4.Bc4 Nf6 5.d4 fxe4 6.dxe5 exf3
7.exf6 Qxf6 8.gxf3 Nc6 9.f4 Bd7 10.Be3 O-O-O 11.Nd2 Re8 12.Qf3
Bf5 13.O-O-O d5 14.Bxd5 Qxc3+ 15.bxc3 Ba3# 0-1
Che puň essere vista qui oltre partite addizionali di esempio:: Boden's Mate http://scacchi.vecchilibri.eu/partite/boden.html
No support or additional friendly pieces are needed, when the Queen is at a Knight's jump, as in the following diagram, a pattern of his own: the Queen controls the light squares and the mate is given by a cooperating Bishop on the dark squares diagonal.
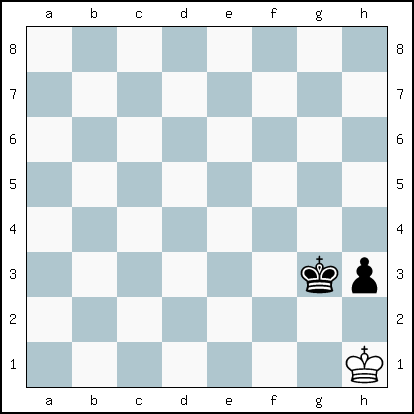
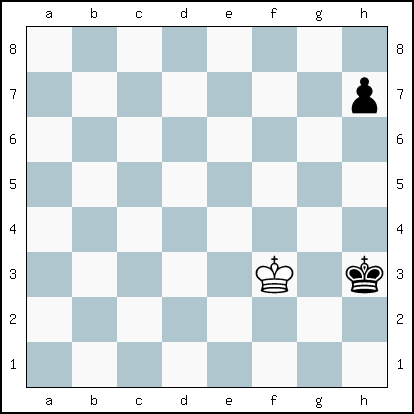
Il Nero non riesce a sloggiare il Re bianco, e se avanza il pedone è patta.
Black to move: Black is not able to drive away White's King, and if the pawn advances, it's stalemate, which is a draw.
If the King moves, White moves between h1 and h2.
For example:
1. ...  h4
h4
2. h2 g4
3. h1 g3
4. g1 h2
5. h1 h3 stalemate
White to move:
1. g1 h2
2. h1 h3 stalemate
=/=
Per esempio:
1. ... h4
2. f4 h3
3. f3 h5
4. f2 h4
5. f3 h2
E cosě via.
In both cases, it is the fact that the pawn is a Rook pawn which makes stalemate possible. Therefore, when exchanging pawns, the winning side should prefer a Knight-pawn endgame (b or g file), while the losing side should aim for a situation where the remaining pawn is a Rook-pawn (a or h file). This is fully explained in my book "The Most Important Chess Pattern".
Qui potrete trovare partite di esempio e scaricare il PGN: Theoretical draw http://scacchi.vecchilibri.eu/partite/theoretical_draw.html
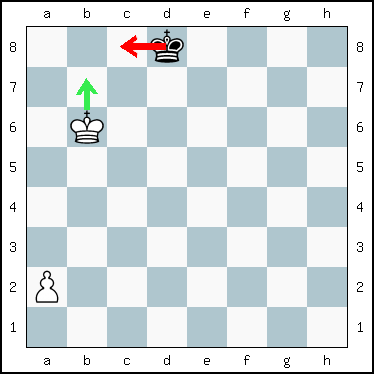
Le case critiche sono le case che è importante raggiungere prima dell'avversario, e dipendono ovviamente dalla posizione.
In quest'esempio Re + padone vs. Re la casa critica è b7, se il Bianco ha la mossa e riesce a raggiungerla, il pedone viene promosso senza che il nero riesca a fermarlo.
Se la mossa è al Nero, e conquista c8, impedisce al Bianco di occupare b7, e forza la patta (in quanto viene raggiunta una delle posizioni del pattern 18).
Quando i Re non sono nella posizione del diagramma, devono cercare di raggiungere la casa critica b7 prima dell'avversario.
=/-
In un finale Re+pedone vs. Re le case critiche sono quelle che se occupate dal Re assicurano la vittoria, chiunque abbia la mossa.
Nel diagramma sovrastante, a sinistra, c5 (dove si trova il Re bianco) non è una casa critica. Se la mossa tocca al Bianco, non vince, è patta.
1. d5 d7! in opposizione
2. c5 c7! davanti al pedone
3. c6 c8 davanti al pedone
4. d6 d8! in opposizione
5. c7 c8 cerca riparo
6. c6 stallo.
in quanto il Re nero non ha mosse legali e non č sotto scacco.
I cannot count the number of times I have seen random moves by Black in similar positions! In my opinion this is the most important sequence to be learned in this handbook, worth alone what you spent. Remember it well, try it with your friends, and if you are able to gain a few half points by applying it, be sure to leave a positive review!
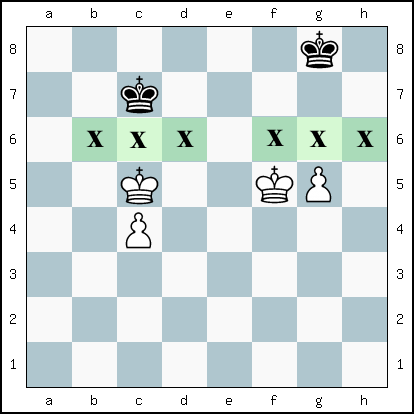
Critical squares are two ranks ahead of the pawn on c4: b6, c6, and d6
(marked with an X on a green
background to help you remember). If it's Black turn to move, he has to
step back, allowing his opponent's King to occupy a critical square, and then win.
1. ... c8 2. c6 occupying one critical square,
bound to win d8 3.b7! d7
4. c5 d8 5.c6 and promotes.
When a pawn reaches the 5th rank (g5 on the right), the critical squares are only one rank ahead, that is f6, g6, and h6. White's King wins if it is able to reach any of these squares. Obviously he wins only if he knows how to properly apply the principle of opposition, squeezing out his opponent's King, and not moving straight towards stalemate.
An additional warning about the position on the right, when the pawn is a
Knight-pawn (b or g file):
moving 1. f6 is dangerous, because if Black moves
1. ... h7, then 2. g6+? h8 results in a draw.
If 3. f7 stalemate. If 3. g7+ g8
4. g6 stalemate.
Try the moves above on a chessboard and find out what the second move for White should be in order to win. Only one move wins (of 6 possibilities) -- all the others draw.
Qui potrete trovare partite di esempio e scaricare il PGN: Opposition and critical Squares (http://scacchi.vecchilibri.eu/partite/opposition.html)
Potete allenarvi qui: Opposition (http://www.chessvideos.tv/endgame-training/useful-maneuver-5.php)

Soluzione:
1. axb4
(1. Rxb4 ? perde, perché resta il pedone sulla colonna "a" e il Nero
riesce a impedire il raggiungimento della casa critica "b7" Rd6 2. Rb5 Rc7 3. Ra6 Rb8 4. a4 Ra8 5. a5
Rb8 6. Rb6 Ra8 7. a6 Rb8 8. a7+ Ra8 )
1... Rd6 {vincente} 2. Ra4 Rc6 3. Ra5 Rb7 4. Rb5 Rc7 5. Ra6
{ha raggiunto la casa critica posta a due traverse davanti al pedone, quindi vince}
Rb8 6. b5 Ra8 7. b6 Rb8 8. b7 Rc7 9. Ra7 Rc6 10. b8=Q
Letture consigliate:
Flear, Glenn, Pawn Endgames, Everyman Chess, 2004, 192 pp.
Paoli, Enrico, Il finale negli scacchi, Mursia, 1974, 504 pp.
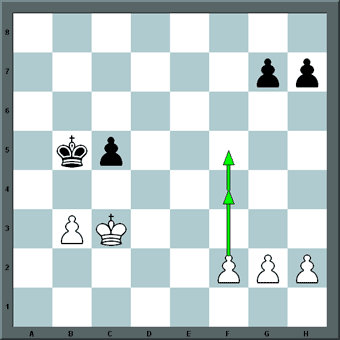
Da una regolare maggioranza di pedoni, deve risultare un pedone passato. In quest'esempio di 3 a 2, il pedone che
non ha oppositori è considerato il "candidato", ha la preferenza. è quello che avanza, gli altri lo
accompagnano.
Così la sequenza è: f4, f5, g4, g5, f6.
Grosso errore sarebbe avanzare il pedone g per primo: ma a g4? segue g5!, e la maggioranza di pedoni non
serve a niente.
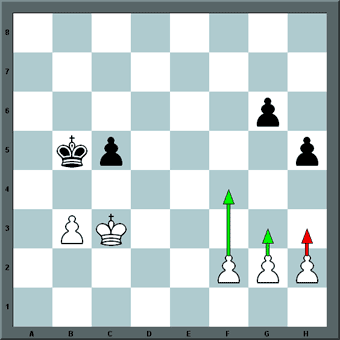
Se i pedoni del Nero sono su g6 e h5, allora f4, g3 (non h3? con risposta h4 e paralisi), h3, g4, f5.
Se ci si trova invece dalla parte della minoranza, bisogna spingere contro il candidato per immobilizzarlo, facendolo arretrato forzando un compagno ad avanzare.
Questa tecnica č spiegata da Aron Nimzowitsch, che ha coniato il termine "candidato"", ma č stata considerata inizialmente da Cozio in Il gioco degli scacchi, nel 1766!, pertanto non c'č scusa per non conoscerla.
Potete vedere molte partite di esempio e scaricare il PGN qui (http://scacchi.vecchilibri.eu/partite/candidate.html)